
bulk import
import
|
Below is a summary of the updates made over the past few weeks on the online Bidding platform. If you have any questions or concerns regarding the latest release notes, please reach out to your account manager. |
|
DEV-1286- UPDATE- Catalog App Update Version 2.2.1 A new look for the app is available immediately upon opening the app to log into your account. |
 |
|
Non-UI visible updates in this version include updates to the overall navigation and screen loading, camera libraries and software packages per changes from the Google Play and Apple App Store requirements. Click on the links below to download the updated app from your device's respective App Store: |
 |
 |
|
|
|
DEV-1248- Feature Update- SiteAdm: Bidder Welcome Email: Subject Line Update: NextLot has updated the subject line of the "Welcome Email" that bidders receive after they complete setting up their bidding account. The new subject line now reads, "Thank you for registering with {Site name}." This change aims to better align the registration email subject format and strengthen the white label experience. Below is an example of registration email that was received prior to the update: |
.png?upscale=true&upscale=true&width=560&height=518&name=Screenshot%202025-02-24%20at%2011.38.33%20AM%20(1).png) |
|
Below is an example of the update following the update: |
 |
|
|
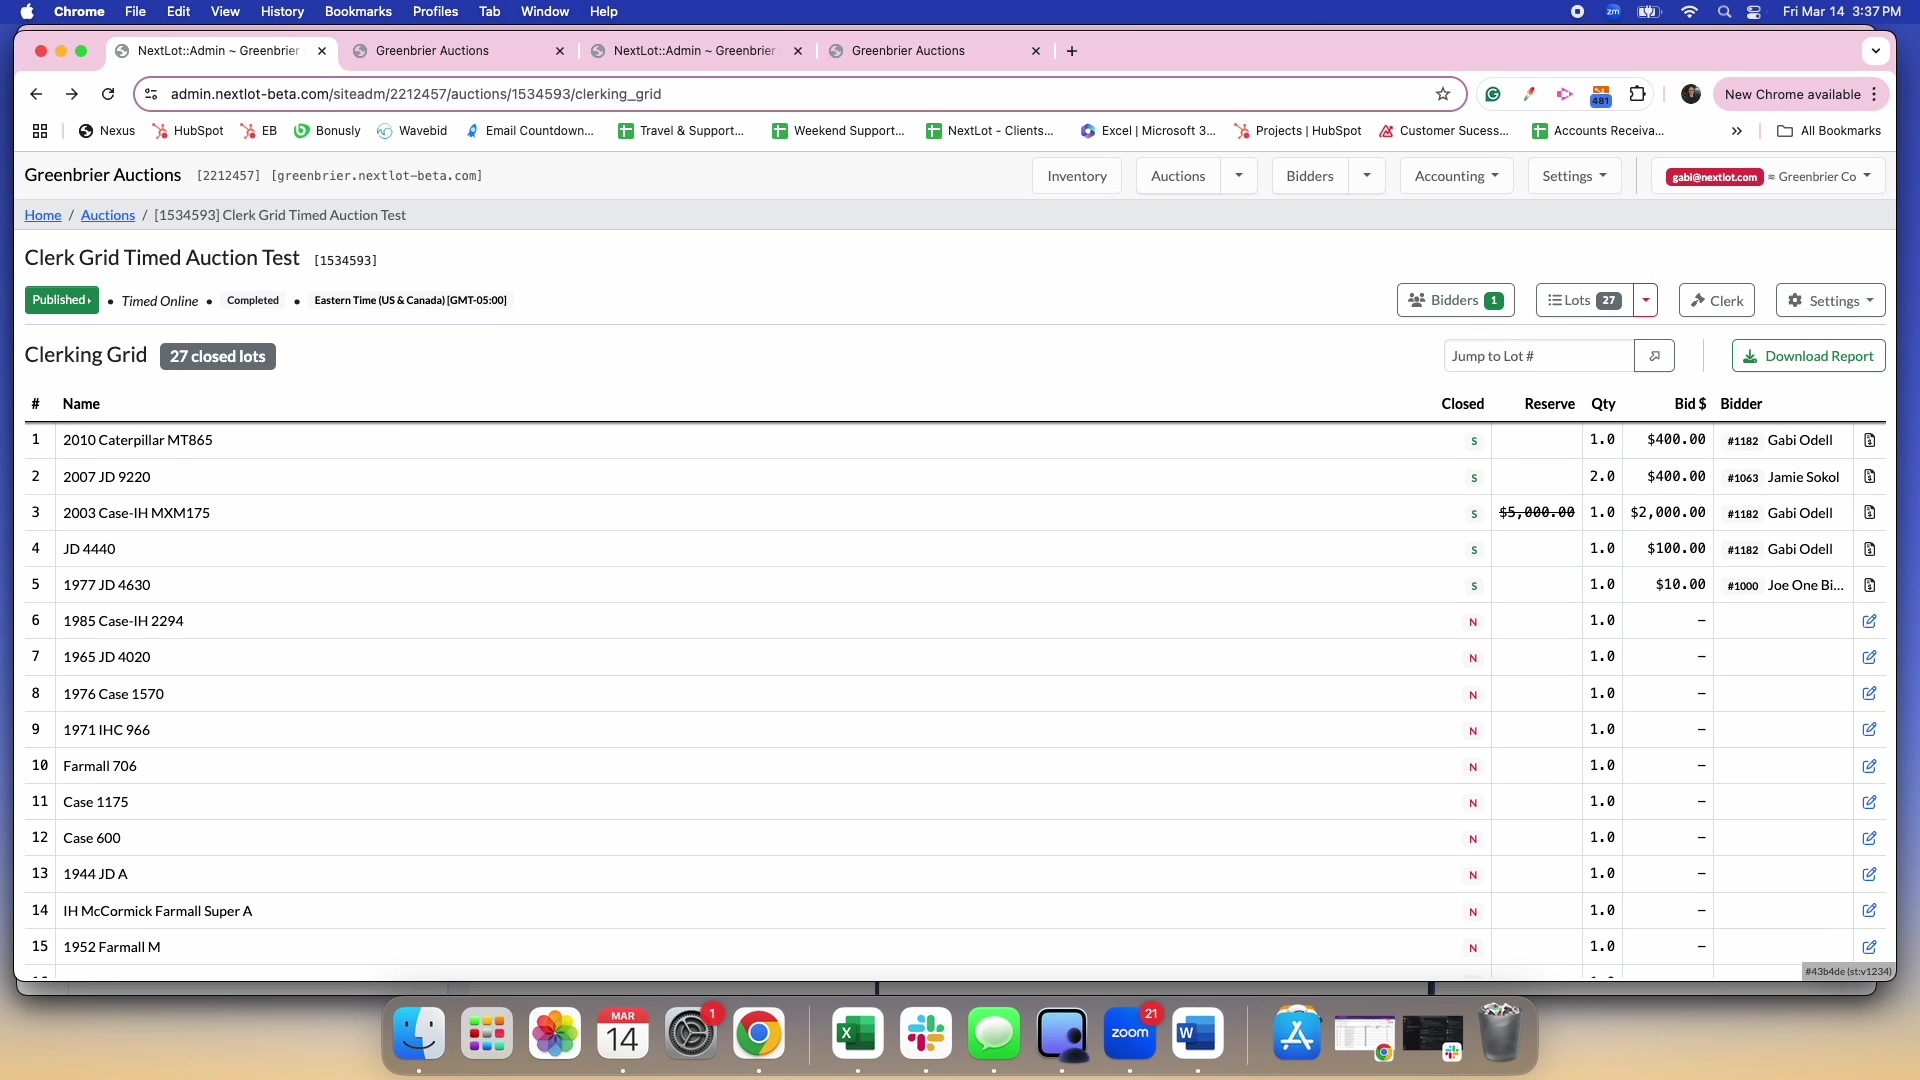
DEV-1046- Clerking Grid Webcast & Timed Auctions NextLot has begun releasing features that will make updating bidder invoices significantly easier. The first major step for this was to create what is colloquially referred to as the "Clerking Grid" within NextLot. This is the area within an auction where a closed lot's sold status, quantity, selling price and winning bidder information can be edited. This area allows auctioneers begin to check bidders out BEFORE a timed auction has fully closed (helpful for those large consignment auctions) as well as assign onsite bidders to a particular lot in live webcasts. This is the first release for this feature and continued improvements will be made to accommodate further complex processes that will inevitably occur within auctions. The clerking grid open is available for ANY auction once the auction opens for bidding (either the prebid period (if applicable), webcast period or timed opening point). Below is a sample of the clerking grid button within the auctions listing in the admin UI. |
 |
|
It is important to note that the clerking grid feature will not be available for upcoming auctions, only auctions that are currently running and auctions that are completed. |
-1.png?upscale=true&upscale=true&width=560&height=223&name=Screenshot%202025-03-13%20at%209.32.11%20AM%20(2)-1.png) |
|
Below is an example of accessing the clerking grid once you are within a particular auction. |
 |
|
Please note that the clerking feature cannot be used until the Lots start to close. You cannot clerk Lots that are still open for bidding (please see video below). |
 |
|
Once you click the "Clerk" button, you will be able to see what Lots have closed. Once a Lot has closed, you can edit the quantity, leading bid amount, and the bidder who won the Lot by clicking the blue pencil icon next to the bidder who won the Lot (see example below). |
 |
|
To generate a single invoice for a bidder during the auction's closing, the lot must FIRST show sold in the clerking grid. Next, go to the Accounting tab, select Bidder Invoicing, and then navigate to the Bidders sub-tab. Enter the bidder's number or full name in the search field, click the blue "Billing" button on the right under "Status," check the invoice you wish to generate, and click "Generate Draft Invoice." The invoice will then populate, and you can edit it if needed (e.g., remove sales tax). Finally, you can send the invoice to the bidder via email. (See these steps outlined in video #1 below.) You also have the option to invoice bidders for other auctions (if applicable) that occurred within the past 3 weeks. Simply follow the same process as above, and this will generate a multi-auction invoice that includes all lots from the selected auctions. The invoice will be customized according to the settings of the primary auction. To set the primary auction, select it from the drop-down menu under the Invoice-able Lots section after searching for the invoice-able bidder (see the steps outlined in video #2 below). Please be aware that if you generate an invoice for a bidder who has already paid their initial invoice but wins additional items later in the auction, a second invoice will be created. This ensures better bookkeeping by having separate invoices. *Again, please note that the Invoice-able Auctions will only show invoice-able lots within the past 3 weeks. |
Video #1 |
 |
Video #2 |
 |
|
Bulk invoices cannot be generated until all Lots have closed. During the auction's closing process, only individual invoices can be created for bidders. Once bulk invoices have been generated, any necessary edits must be made directly through the invoice and will reflect in the clerking grid. The process for generating bulk invoices remains the same within the system. Please refer to this article if you need a refresher on how to generate bulk invoices. Additionally, you may notice changes to the invoicable auctions page. You can now easily navigate to the accounting settings by clicking the grey gear icon next to the auction name. To access the clerking grid for the auction, simply click the grey grid icon to the right of the auction name. |
 |
|
Once you generate an invoice with closed lots, any further edits to the lots must be made through the invoice by clicking the invoice icon next to the winning bidder's name in the clerking grid. This will direct you to the invoice, where you can make the necessary changes. Changes within the invoice will automatically update in the clerking grid. |
.png?upscale=true&upscale=true&width=438&height=187&name=Screenshot%202025-03-14%20at%203.56.07%20PM%20(2).png) |
 |
|
If you wish to sell a Lot that had a reserve but did not meet the reserve during bidding, you can click the blue pencil icon and update the status from "Pending" to "Sold." You can either manually enter an amount agreed upon by the seller and bidder or sell it at the highest bid amount if the seller agrees, by changing the status from "Pending" to "Sold" (see the video below). If no agreement is reached on the amount, the Lot will remain marked as "Pending" and will not appear on the invoice. |
 |
|
In the clerking grid, you have the option to assign a Lot to a bidder who did not participate in the auction. To do this, first check in the bidder by clicking the "Bidders" button for the auction. Search for the bidder, click "Online" next to their name, and then click "Approved." Next, go to the closed Lot in the clerking grid, click the blue pencil icon, enter the checked-in bidder's number, and input the sale price of the item. Then, open the drop-down menu next to "No sale" and change it to "Sold." Finally, click the blue check mark, and an invoice will be generated for this bidder with the correct Lot(s) (see example below). Please note that you can only assign a bidder to a Lot if they are already a registered bidder in the system. You CANNOT complete this process for someone who does not have an active bidder account. |
 |
|
Any changes you make to a Lot within the clerking grid will NOT be visible on the public UI and will NOT be reflected in the Timed Report. To access the most up-to-date information, such as sold prices, simply click the green "Download Report" button within the clerk grid. |
.png?upscale=true&upscale=true&width=560&height=307&name=Screenshot%202025-03-13%20at%203.01.20%20PM%20(2).png) |
|
|
Updated Knowledge Base Articles |